
This is a follow up article to the OpenHabian Virtual Machine Install on ProxMox. The difference here is to install OpenHABian in container (LXC) rather than Virtual Machine. After using VM and Container versions simultaneously for a little over a week, my preferred installation method is VM. I simply have less issue with VM version and reboot of VM is much faster than that of Container.
UPDATE HISTORY
– 4/22/2021: Trouble Shoot Section – Log Viewer not working added
– 5/1/2021: Personal recommendation of VM added at the beginning.
What you will learn in this article:
- How to setup OpenHABian Container (LXC) on ProxMox
Who is and isn’t this guide for?
For
This guide is for those who wants to install OpenHABian on container (LXC) setting like on ProxMox.
Not for
- those who are familiar with docker setup e.g. know how to setup primary network IP, Samba setting etc. You can simply install official docker version of openHAB from official openHAB site or docker site.
- those who already have Debian based system where you are ok installing the openHAB on it. You can follow official instruction.
- those wanting to install OpenHABian on Rasberry Pi. You can follow official instruction.
- those wanting to install OpenHABian in Virtual Machine setting. Please refer to the separate article.
Why OpenHABian?
From a novice user stand point of view, I see OpenHABian as a special type of OpenHAB.
The Raspberry Pi is quite a famous platform for openHAB. However, setting up a fully working Linux system with all recommended packages and openHAB recommendations is a boring task, takes a lot of time and Linux newcomers are challenged in a number of ways although all they want is to run openHAB and not some server.
A home automation enthusiast doesn’t have to be a Linux enthusiast!
openHABian is a self-configuring Linux system setup to meet the needs of every openHAB user. It provides:
– Complete SD-card images pre-configured with openHAB for the Raspberry Pi line of SBCs
https://www.openhab.org/docs/installation/openhabian.html
– The openHABian configuration tool to set up and configure openHAB and many related things on any Debian based system
The key here for new openHAB users like myself is that openHABian is a openHAB platform that have self-configuring capability, built in configuration tools and many related things e.g. Samba Share. This to me is analogous to Home Assistant OS as compared to Home Assistant Core/Docker.
Why Container?
Primary reason is docker did not allow me to install OpenHABian. I am worried Rasberry Pi installation may quickly hit performance limitation due to the hardware, especially my Rasberry Pi is version 3B. Container vs. Virtual Machine is more detail than I can currently understand, but in a big picture, Container has less overheads/resource hogging than Virtual Machine. The trade off is lack of kernel level isolation.
OpenHABian on ProxMox Virtual Machine Setup Guide
Pre-requisite
- Running ProxMox server. Most likely other virtual machine setup should work in a similar fashion.
Overall Steps
The general step turned out to be simple.
The openHABian configuration tool to set up and configure openHAB and many related things on any Debian based system
As official site states, what we need is a Debian based system. So what we should be doing is create a Debian based container on ProxMox. Then install OpenHABian. Since this container will be used purely for OpenHABian, my preference is not install anything unnecessary component of Debian such as Debian GUI.
- Download Debian Linux Image
- Upload Debian Linux image to ProxMox server
- Create new Debian virtual Machine on ProxMox
- Setup command line input only Debian
- Install OpenHabian
Download Debian Container Image
You need to first download Debian Container. For the case of ProxMox, you will be doing this by using command line input.
Open ProxMox node Shell
ProxMox has container installation commands.
# pveam updateThe command above will update the list of available container though system reportedly updates the list daily.
# pveam availableThe above command will list all available containers as below.

There are many Debian container variants. I think we can simply choose the latest standard. So for the case above, I chose: debian-10-standard_10.7-1_amd64.tar.gz
You can copy and paste on the console window, so I’d suggest you to just copy the name. Now we need to download the container image into local machine.
# pveam download local debian-10-standard_10.7-1_amd64.tar.gzYou can now confirm the container image has been downloaded to the ProxMox server.
Go to your ProxMox server i.e. https://[ip-address]:8006

Datacenter > [Node] > [Storage] > CT Templates

Reference: PVE ProxMox Wiki Linux Container
Create New Debian Container
On your ProxMox, hit Create CT on right upper corner


On this screen, I named my Container as OpenHABian because that’s the only thing this will be doing. Password here will be a root account password.

On the Template setting, you want to use the Debian image file you just downloaded. If you have not done the first step, this will be blank i.e. no option to choose from and you cannot proceed.

Disk size is your choice. I’ve selected 32 GB.

CPU setting is up to your choice and depends on your system. My system is NUC10i7. Considering OpenHabian is written for Rasberry Pi, I did not see much need of CPU here, so I chose 2 cores.

Memory is also your choice. I set mine to total 4 GB potential as hardware recommendation by official openHABian is 2 or 4 GB on Rasberry Pi 4.
According to ProxMox official document, following are definition of memory & swap.
| memory: | Limit overall memory usage. This corresponds to the memory.limit_in_bytes cgroup setting. |
| swap: | Allows the container to use additional swap memory from the host swap space. This corresponds to the memory.memsw.limit_in_bytes cgroup setting, which is set to the sum of both value (memory + swap). |

Network setting default is static IP but I changed to DHCP because I want control my IP address through my network controller itself rather than by individual machine.

Leave this to default.

Finally confirm the setting and Finish.
Setup Command Line Interface
At this point, you have installed Debian OS on the container. However, if you hit console button at this stage, all I got is blank screen without being able to enter typical command line input. This is because we are in TTY mode rather than Shell mode. So we need to change it to Shell mode.
On the newly created container > Options > Console Mode

You want to change Console mode from TTY to shell; otherwise, opening console give you blank screen without taking your command input.
change Console mode from TTY to shell;

Now you can start the Container and open console. You should now see command line input screen.

Install OpenHABian
Now all we need to do is follow the official openHAB site’s Other Linux Systems openHABian installation instruction.
You need to enter following lines. I did one at a time.
# install git - you can skip this if it's already installed
apt-get update
apt-get install git

# download, link and create config file
git clone -b openHAB3 https://github.com/openhab/openhabian.git /opt/openhabian
ln -s /opt/openhabian/openhabian-setup.sh /usr/local/bin/openhabian-config
cp /opt/openhabian/openhabian.conf.dist /etc/openhabian.conf
Copy and paste one line at a time except # line which is just a comment.
openhabian-config unattendedThis code initiates automated openHABian installation just like if you were to insert bootable SD card into Rasberry Pi for the first time.

The process may look hung at above step but it is normal. It took me 5 minutes or so to pass this step.
Upon completion, you have full openHABian running.
You can check the IP address of where this container is running by entering following command to shell screen.
ip addrNow you can just access the OpenHAB instance by entering [ipaddress]:8080 on your browser and start manual configuration.
Additional Setups
I have both container and virtual machine versions setup with OpenHabian. I encountered, different minor issues for each version of the installation i.e. OpenHabian installation did not configure fully to its capacity on each platform in a different way. In this section, I will discuss about what I had to change to get those missing functionality work. This may get updates as I encounter more issues.
Log Viewer

Situation: OpenHABian installation comes with Log Viewer. However, clicking on this resulted in blank page with my container installation version of OpenHABian.
Background: Log Viewer is useful tool when one is trying to figure out why certain things are not working the way it should be. From the starter perspective, this is almost crucial because you are very likely to encounter various issues while setting up the binding (integrations) and error messages shown on individual thing/item are often not useful. While Rasberry Pi 3B installation or Virtual Machine installation version worked out of the box.
Assessment: The frontail.service was not running on the OpenHABian.
Recommendation: Install & Start Log Viewer
Go to ProxMox > Node > OpenHabian Container > Open Console
You can confirm if the Log Viewer is running by entering following command.
systemctl status frontail.service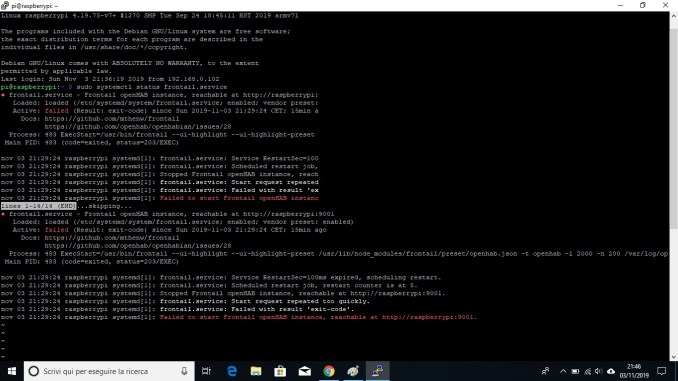
As you can see above shows Failed to start Frontail openHAB instance message. Fronttail is the actual background service the log viewer is based off of. You can exit systemctl by entering Ctrl-C.
All you have to do here is to start the service as OpenHABian comes with fronttail. For this, you can first enter into OpenHABian configuration menu.
Enter the following command in the OpenHABian console/shell.
openhabian-config
Scroll down to 20 Optional Components & Hit Execute

Now select 21 Log Viewer and Execute
You can recheck the frontail service and this time it should be running. You can then reboot your OpenHABian system. Without a reboot, OpenHabian won’t have the correct hyperlink to the Log Viewer.