
In this sixth article in the Protect unleashed series of UniFi Protect with Home Assistant, I will be sharing how I got to have Unifi Doorbell motion sensor to trigger Sonos speaker text to speech announcement. It may sounds very similar to the Doorbell ring triggering for the setup and indeed it is; however, this time I needed to have couple rules to ensure the motion detection announcement won’t be triggering after hours or triggering repeatedly.
Prerequisite
What do you need?
- UniFi Doorbell
- Sonos Speakers
- Home Assistant Hub with
- UniFi Protect Integration
- Sonos Integration
In this article, you will learn:
- How to add Sonos Integration on Home Assistant on Home Assistant
- How to make an automation that announces UniFi Camera Motion Detection to Sonos TTS
- How to use fixed time condition to specify automation operation time
- How to use delay action to avoid multiple successive motion triggers
Add Sonos Integration to Home Assistant
On Home Assistant > Configuration > Integrations > SONOS > Configure
Sonos addition was the simplest integration installation. I just hit Configure button and it detected 3 Sonos speakers in my home. One of which is setup as 5.1 system so it did not separate surround speakers or bass but rather showed up as a single speaker entity. For my future organization, I just changed area where each speakers are located, which you can do afterwards. I just then hit submit and all speakers were ready to go.

Creating UniFi Camera Motion Detection to Sonos TTS Automation
Now, you are ready to make UniFi Protect genius.

Configuration > Automations > Add new Automation

Here you put a name of Automation. A little trick here is to use Emoji at the beginning as suggested by a reddit user. This will help when you start creating many automations since currently there is no official organization system for automations right now.

Trigger section is where you define what triggers/starts this automation. In this particular case, you want to trigger based on Unifi Doorbell Motion started. Unifi Doorbell is name of the doorbell in above example, so if you named your Doorbell differently you will see that as a Device name.
Condition

Condition section is where you can specify the requirement/condition that need to be met before the action takes place (ref). For the case of motion detection, I do not want be waken up so I chose specific time conditions here. In my case, I only want to do motion announcement between 8am and 9pm.

Action specifies what to do when this automation executes. In this case, play a Text to Speech (TTS) on Sonos speaker(s).
This can be done by setting Action type to Call Service then choose a service either tts.cloud_say or tts.google_translate_say.

tts cloud_say is for Nabu Casa subscribed users so you will not see the option if you are not logged into the Nabu Casa. In which case, you can use google_translate_say.
Turn on Cache
Cache here is a cool feature. TTS uses online cloud access but if you were to use that every time, it will have the cloud latency and when internet is not working the doorbell stops working, which is a major issue. Cache will basically access the cloud for the first time and reminder will be locally processed so it becomes really fast after the first ring.
Prevent multiple trigger for 2 minutes
For the case of motion detection, it is important to have some sort of exhaustion time. For example, my spouse may be doing some gardening at the front yard or my kids may go pick up mail from the mail box. We won’t need to be hearing the motion detection announcement every few seconds for these situations. So I basically wanted to have couple minutes of block time before second run of motion detection announcement automation starts. This is where it took me days to figure out.
Initially, I kept searching for a way to prevent automation trigging for given amount of time using “condition”. I thought we could do this by using the last automation/doorbell motion detection time and compare to the current time. This lead me to wrong direction and I started to read about Templating, which is interesting and powerful technique but felt beyond my current beginner level understanding and certainly didn’t want to do this type of thing for just what it seems a simple task. So I struggled. This turned out to be a good example of one may need to think outside of the box. The real solution here turned out to be very simple and elegant. You want to just add one more action at the end.
Add Action

This action is a “delay” action type. The delay specified amount will become part of the automation i.e. the automation is considered to be running for this extra duration without doing anything (ref). The automation mode “Single”(default) will prevent second instance of the automation to initiate until the current one finishes (ref). So combination of single mode and delay action will prevents the automation from running second time for the specified duration. Once I figured this out, I thought its an as elegant solution as it can be.
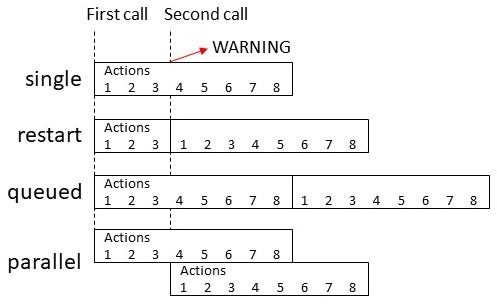
Learning Moment: Automation Mode
For our case, you don’t need to do anything as “single” is a default setting. However, understanding this existence may help you for the future.
| Mode | Description |
|---|---|
single | (Default) Do not start a new run. Issue a warning. |
restart | Start a new run after first stopping previous run. |
queued | Start a new run after all previous runs complete. Runs are guaranteed to execute in the order they were queued. |
parallel | Start a new, independent run in parallel with previous runs. |
Performance Check
This works phenomenally well. I basically have zero issue with speed/performance including the reliability here. Announcement on Sonos can actually take place before UniFi official app notification on my iPhone.